Account Subscriptions Guide
This guide will walk through how to use account subscriptions. It is recommended to complete the previous guides in this section if you have yet to install or import accounts within Polkadot Live. This guide will demonstrate how to:
- Add imported accounts to the main window.
- Manage balance subscription settings for multiple accounts.
- Receiving a balance notification after submitting a live extrinsics.
- Using one-shots to instantly retrieve an account's pending nomination pool rewards.
After completing this guide, you should feel acquainted with Polkadot Live's account subscriptions functionality.
1. Add accounts to the main window.
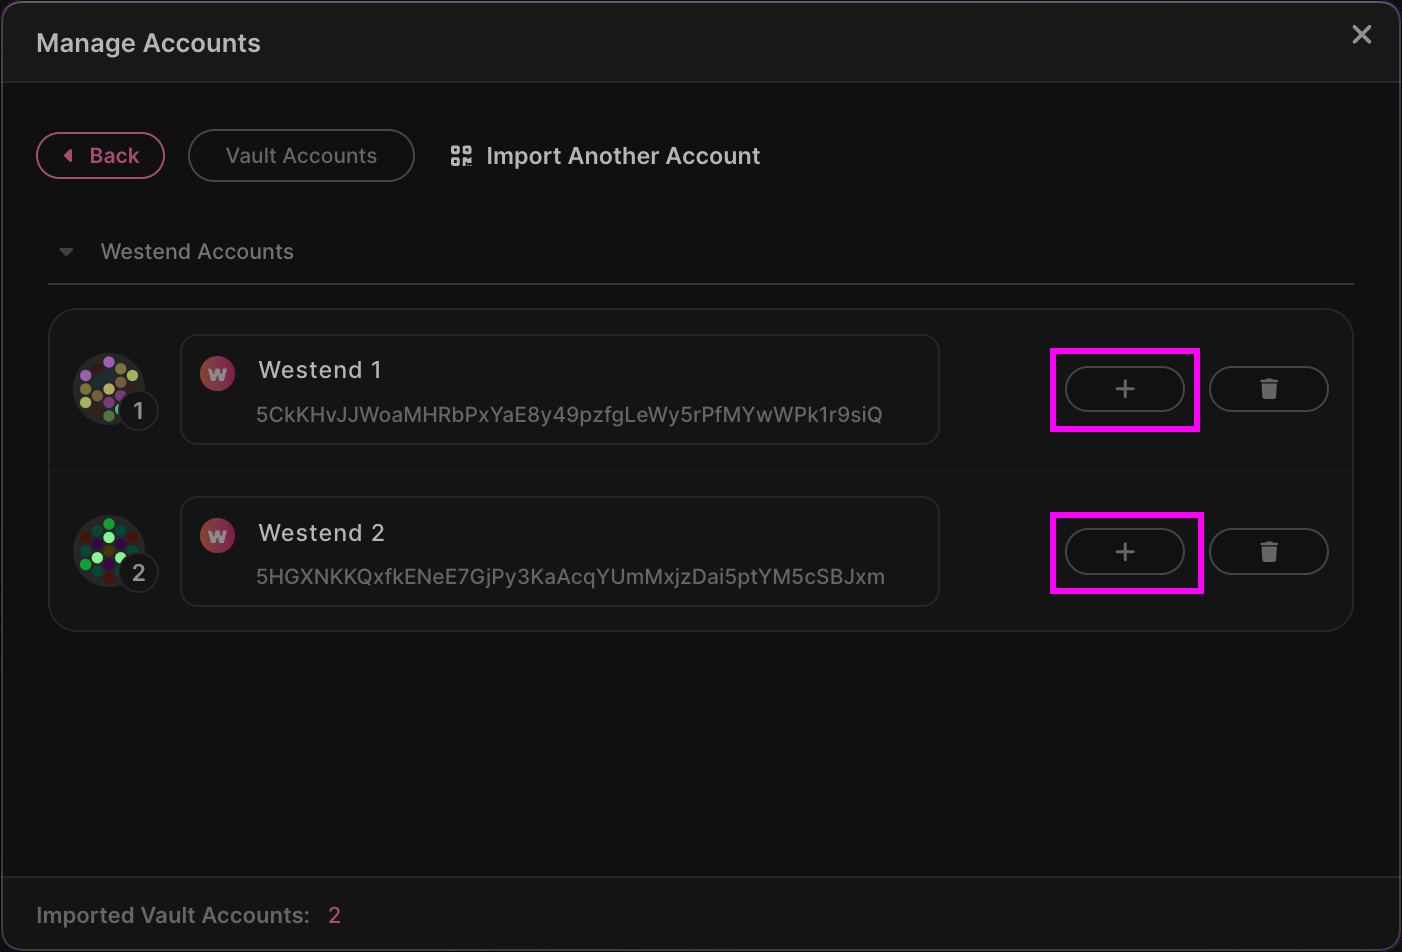
If you haven't already, add a couple of imported accounts to the main window by clicking the account row's + button. A 3-dot animation will be rendered over the button while the account is being processed. During this import process, the account's data will be fetched from its corresponding blockchain network. Such data will include its balance and staking status.
After the import process completes, a native OS notification will be shown to notify you of a successful import. The account will also be listed under the main windows Subscriptions tab. This means that you can now manage the account's subscriptions in the main window.
2. Change the first account's subscription settings.
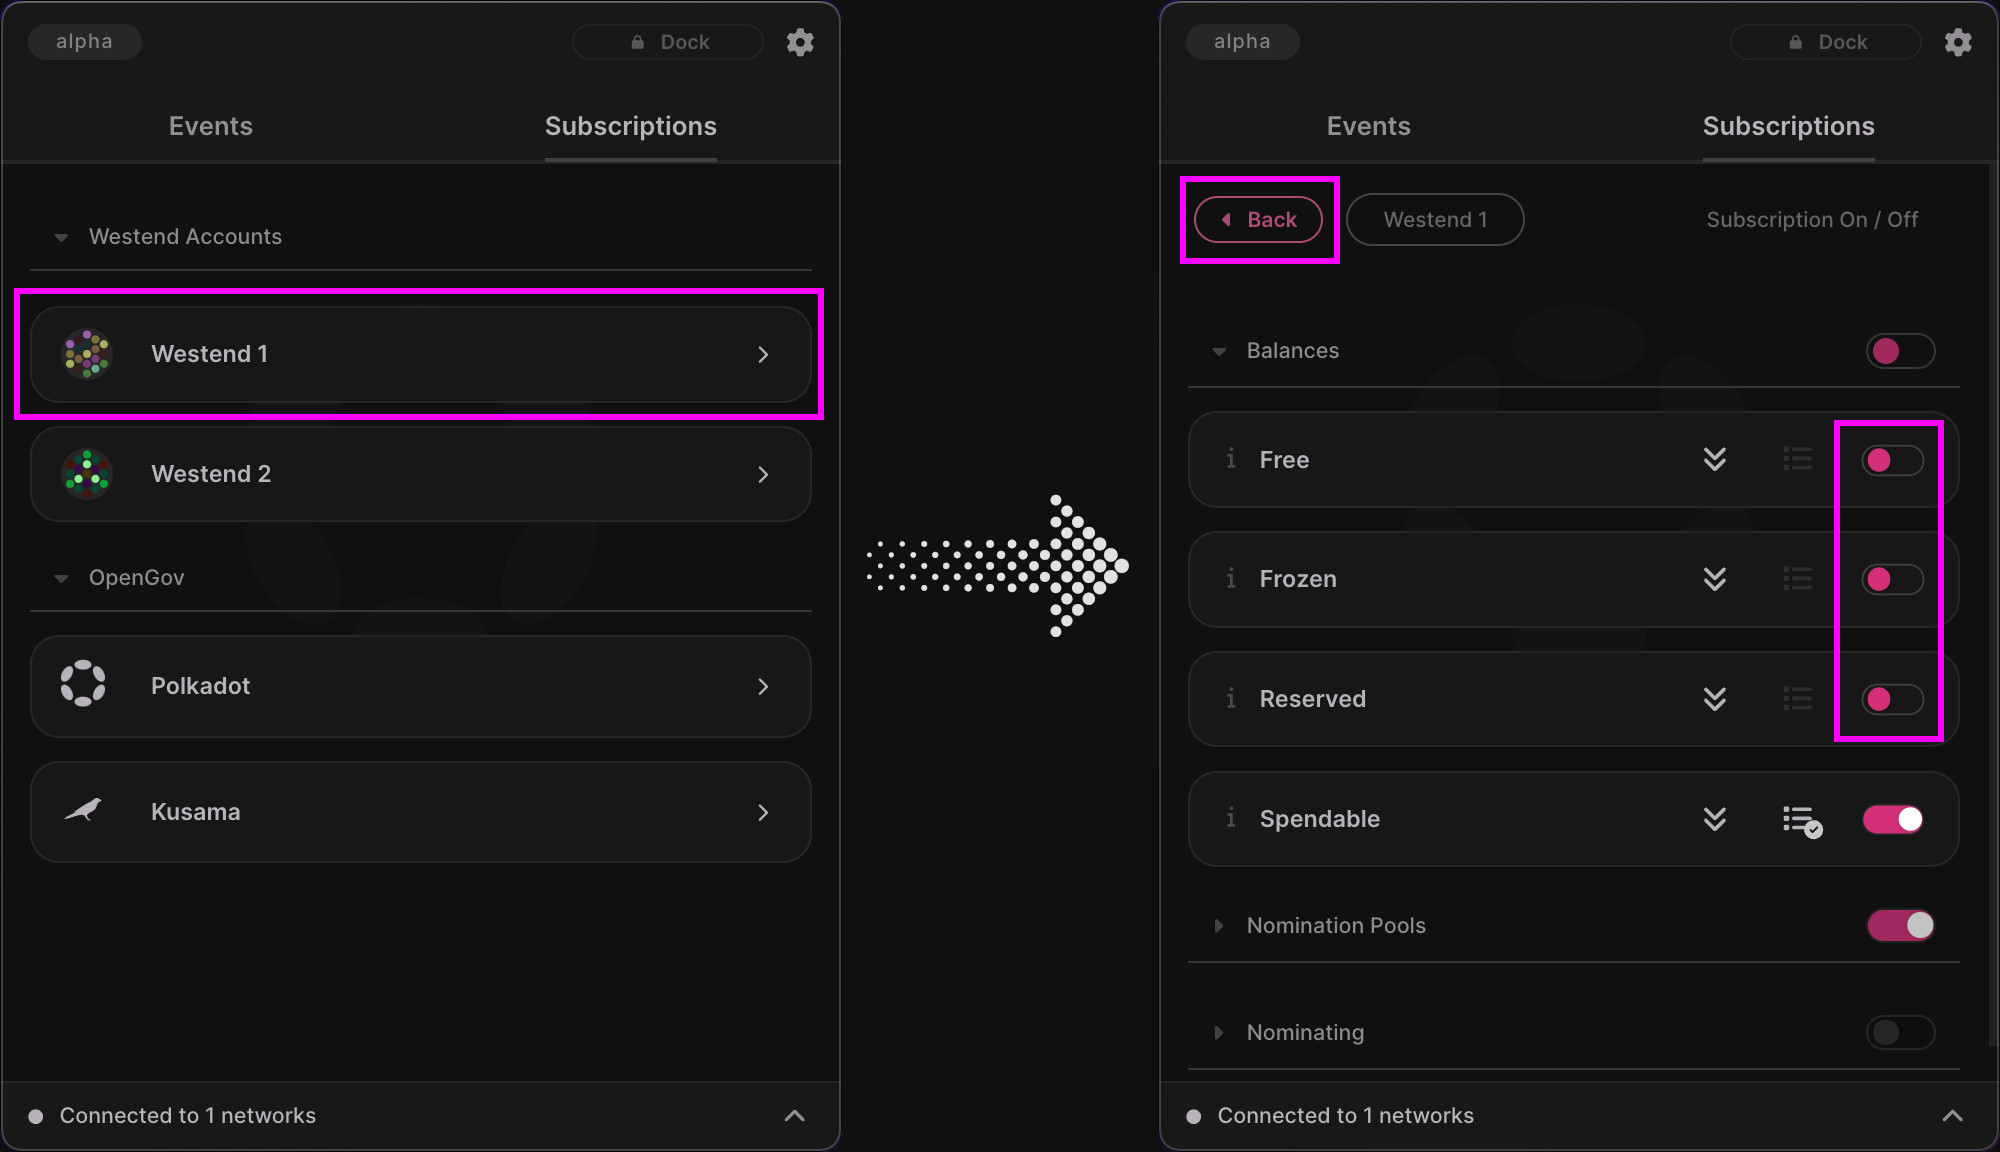
We will now change the Westend 1 account's subscription settings. In this guide, we will turn off all balance subscriptions apart from the Spendable subscription.
Close the Accounts window from the previous step and re-open the main window if necessary. Click the Polkadot Live icon in your system menu bar (macOS) or taskbar tray (Windows) to show or hide the main window.
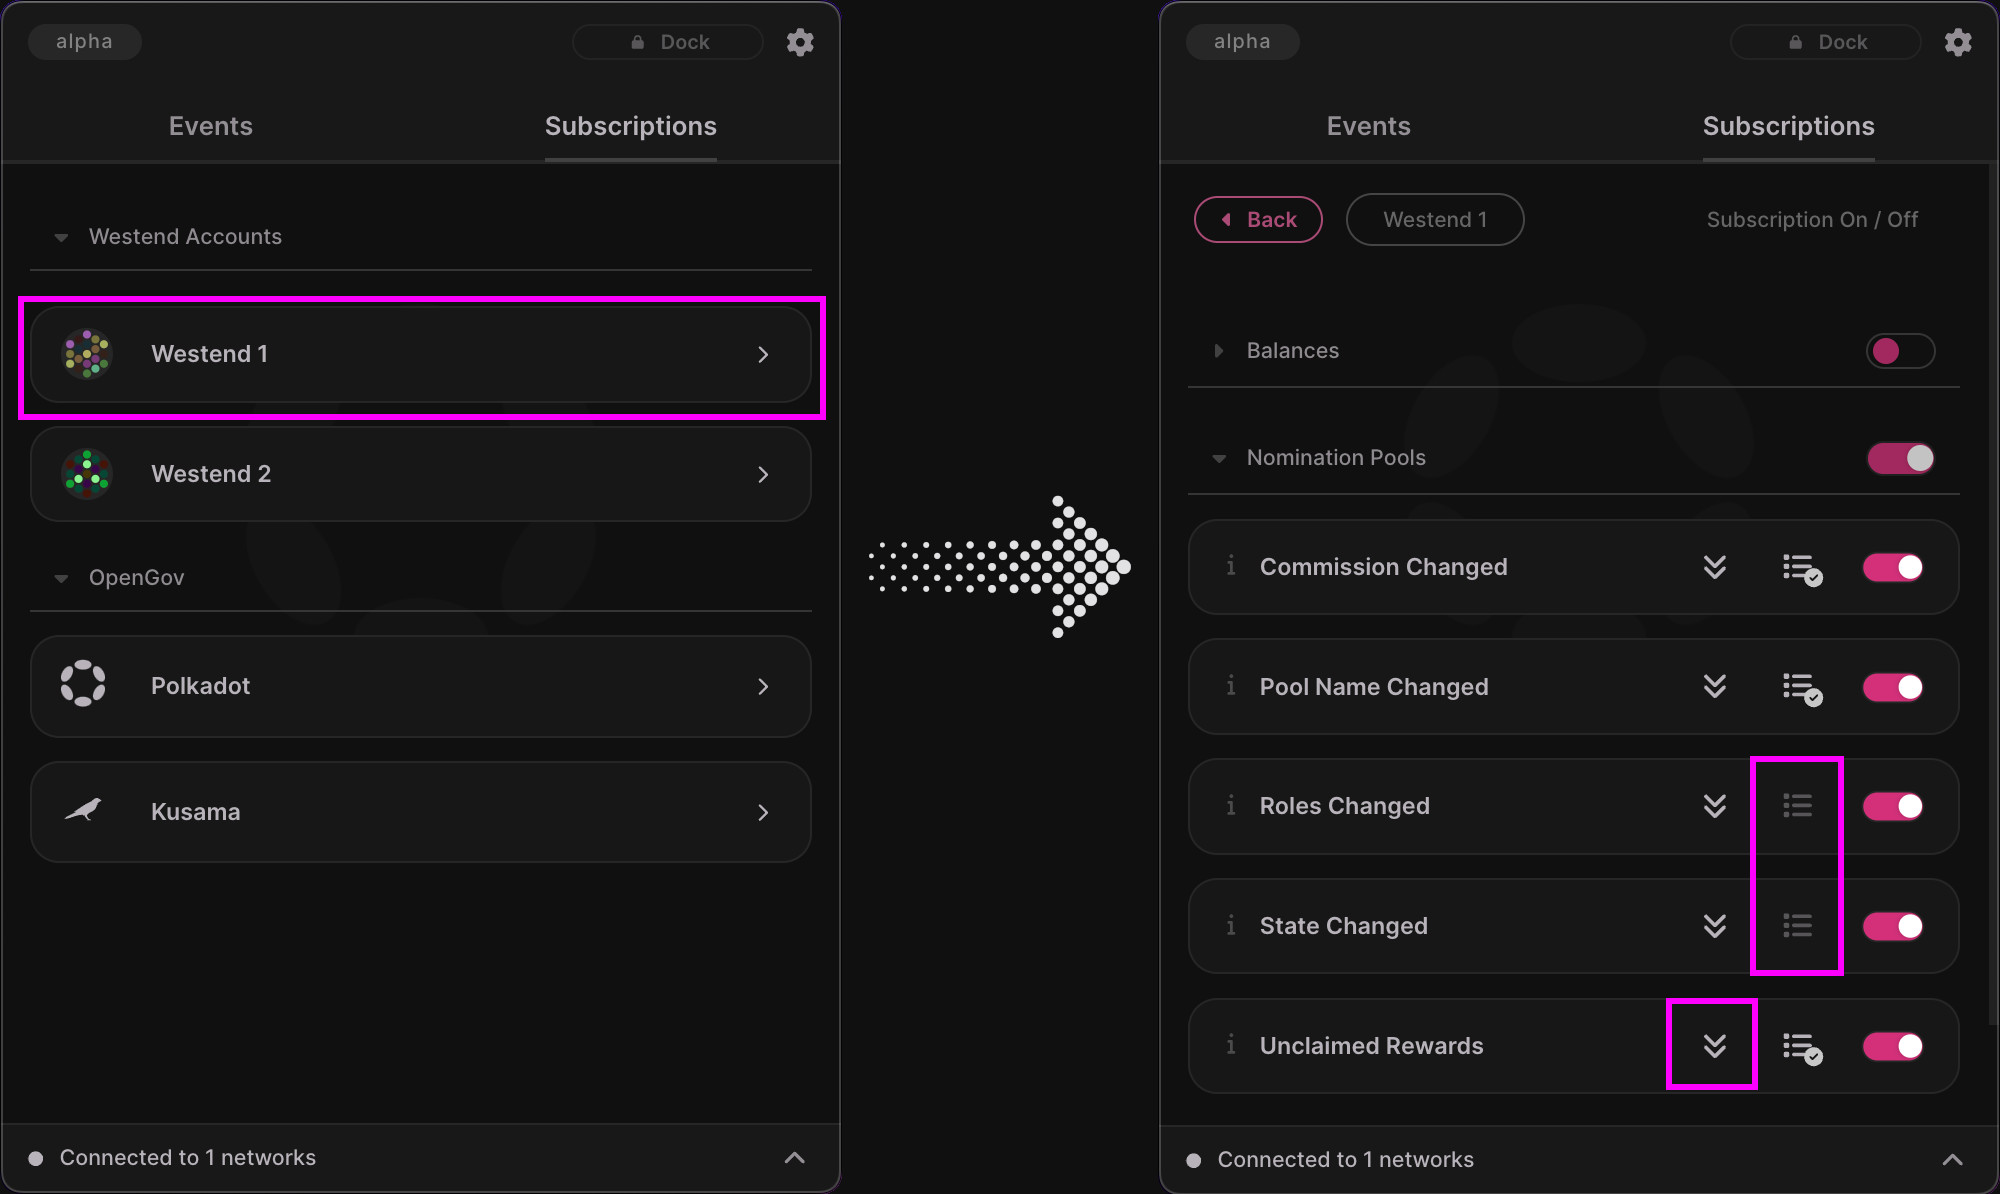
From here, Click the main window Subscriptions tab followed by one of your imported account names to open its subscription settings. In my case, I'll click the Westend 1 account. The account's corresponding subscription settings will slide into view.
To demonstrate receiving notifications for a single subscription, I will turn off the account's Free, Frozen and Reserved balance subscriptions by clicking off the corresponding switch. At this point, only the Spendable subscription is turned on
Also notice that that the Spendable subscription's "OS Notifications" button is enabled (directly to the left of the switch). This means that we will receive a native OS notification when our spendable balance changes, as well as a new event item under the main window's Events tab.
To conclude this step, click the back button to return to your imported accounts listing.
3. Change the second account's subscription settings.
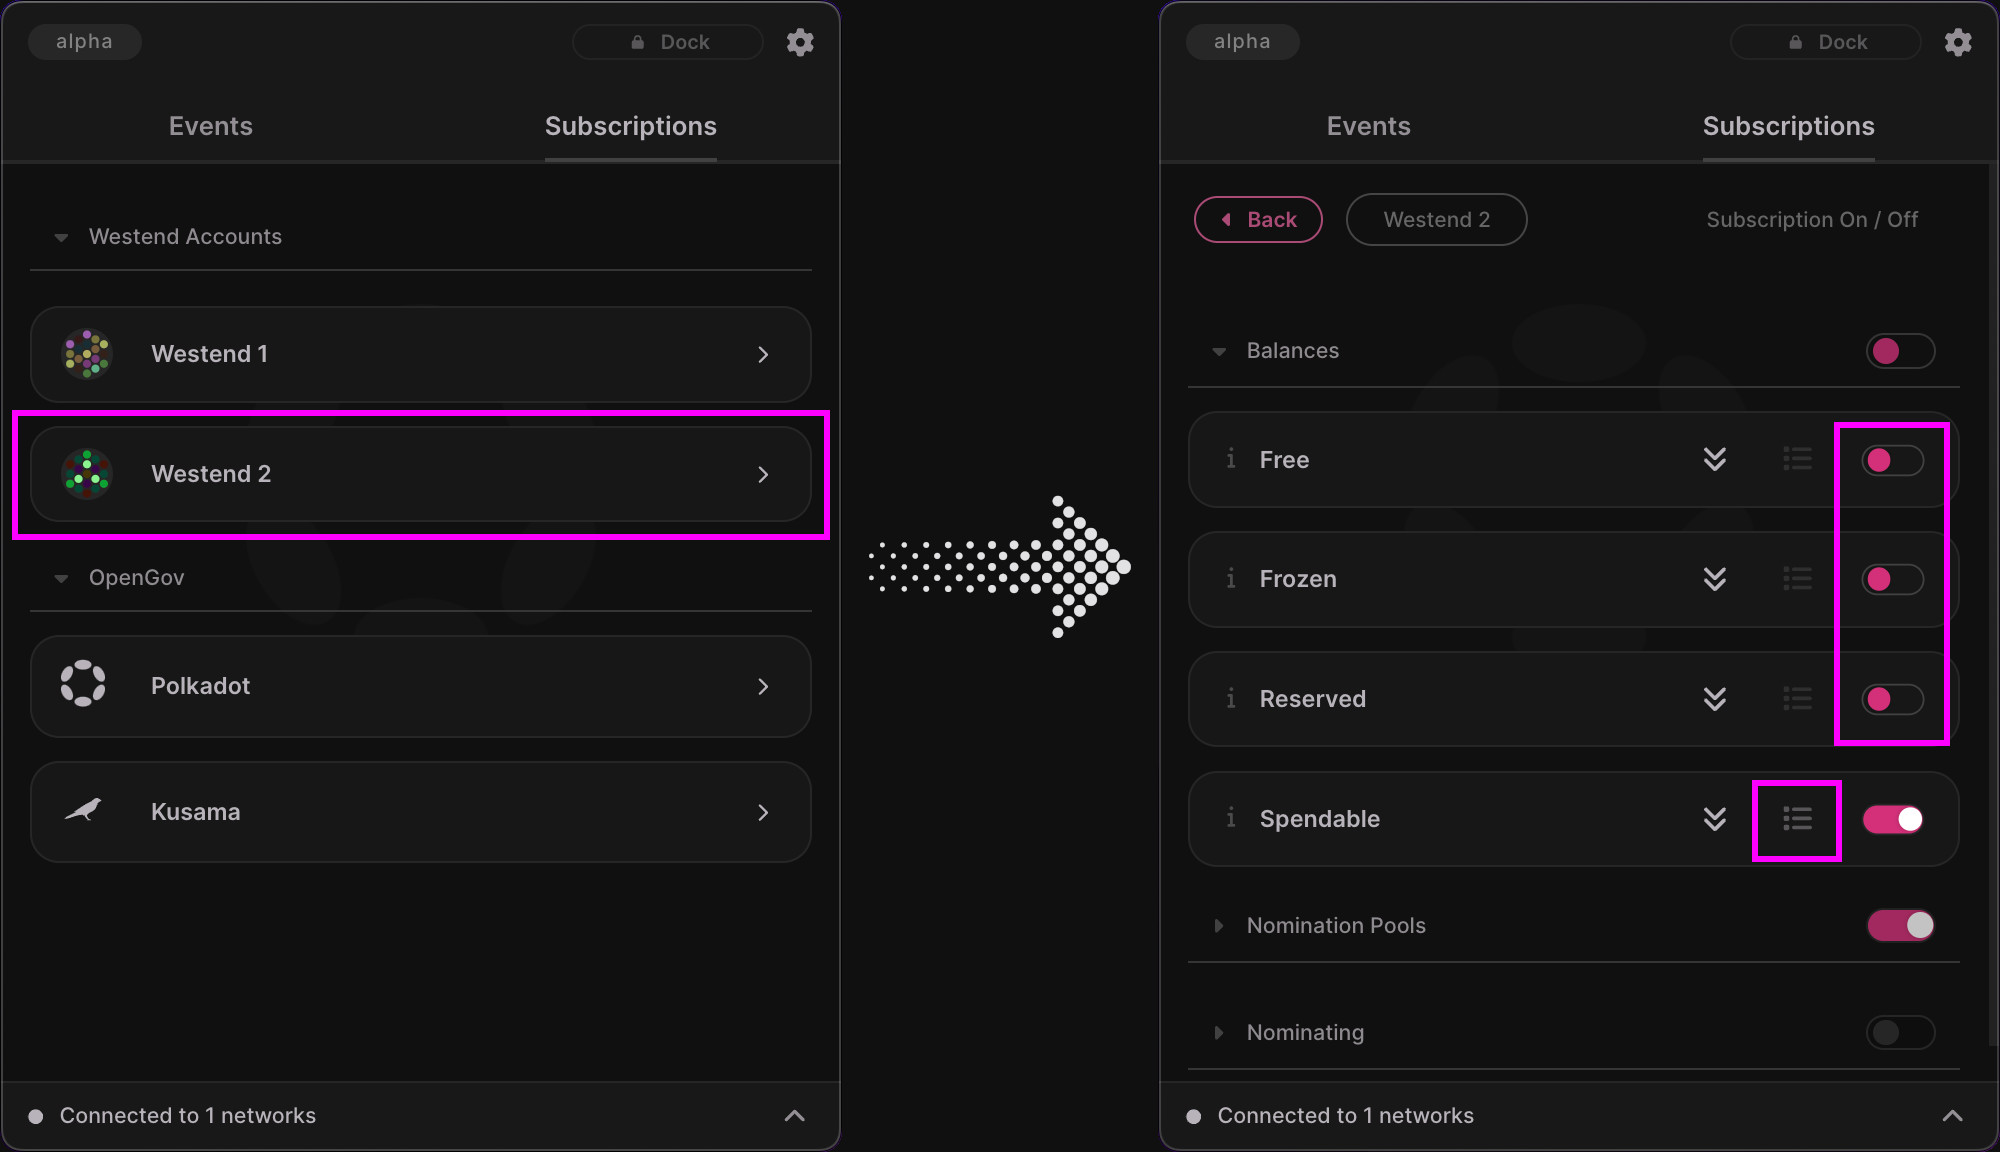
Now we will change the second imported account's subscription settings by repeating the proces just described in the previous step.
However, I will turn off "OS Notifications" for my Westend 2 account's Spendable subscription.
As a result, I will have all balance subscriptions turned off apart from the Spendable subscription. Because I've chosen not to receive OS notifications for this account's Spendable subscription, I will only receive a new event item when my spendable balance changes for this account.
4. Submit a live extrinsic to send some WND between the accounts.
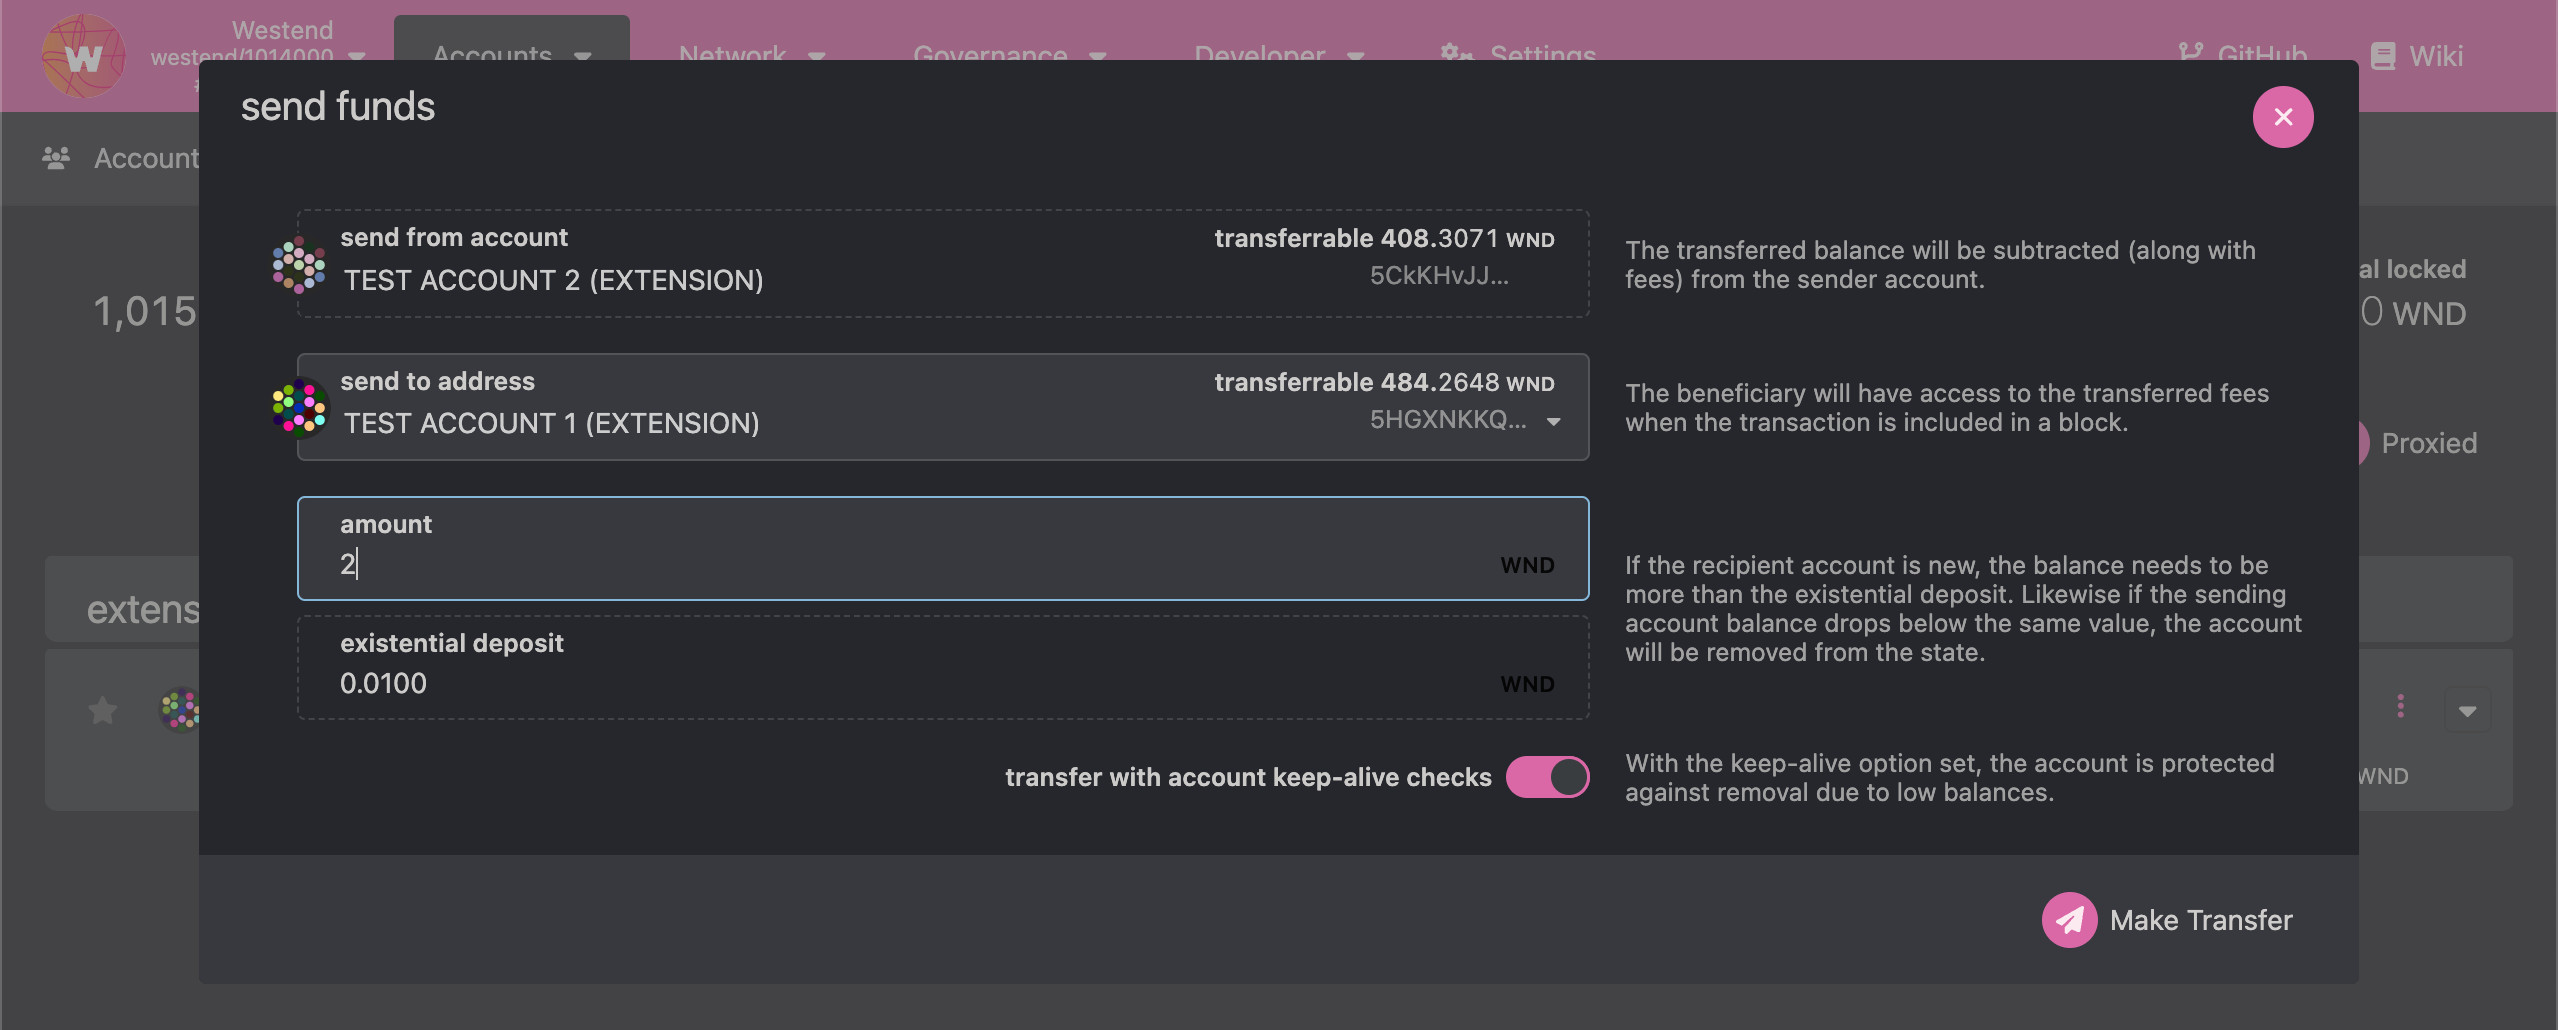
We will now trigger Polkadot Live to react when both of our imported account's spendable balance changes.
I'll send 2 WND to my Westend 1 account from my Westend 2 account using Polkadot JS Apps. Feel free to use any wallet or Dapp to make a transfer between your accounts. As long as you submit an extrinsic to the account's blockchain network and it executes successfully, the transfer method doesn't matter.
5. Receive a native OS notification and event items.
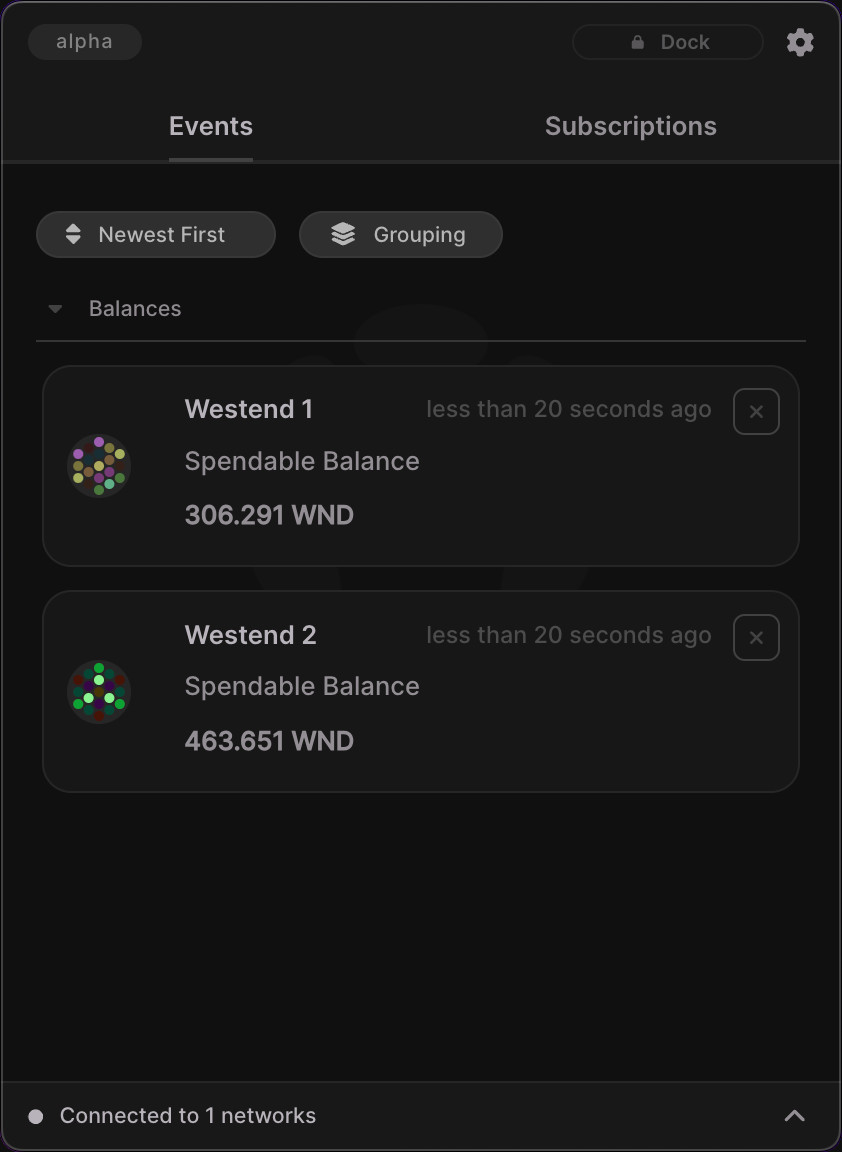
After my extrinsic is successfully submitted and processed on the blockchain network, Polkadot Live will automatically show a native OS notification and display new event items in the main window's Events tab.
Remember that we only enabled native OS notifications for the first account's Spendable subscription? That's why we received only one native notification, even though both of our accounts spendable balance has changed.
We know that both of our account's spendable balance has changed by inspecting the main window's Events tab. As you can see, we received two event items that notify us of our account's new spendable balances.

6. Get the first account's pending nomination pool rewards.
Nomination pool subscriptions will be disabled if your account has not staked to a nomination pool.
Lastly, we will demonstrate how to instantly retrieve an account's unclaimed nomination pool rewards by executing a one-shot.
I'll open my Westend 1 account's subscription settings again and expand the Nomination Pools category. Feel free to adjust the settings for any subscription. In my case, I disabled OS notifications for the Roles Changed and State Changed subscriptions.
To execute a one-shot (also known as previewing a subscription) click on the Get Notification button which is shown as two stacked down arrows. I will do this for the Unclaimed Rewards subscription.
7. Receive a native OS notification and event item.
You will receive a new event item and (optionally) a native OS notification, which instantly display your current nomination pool rewards.

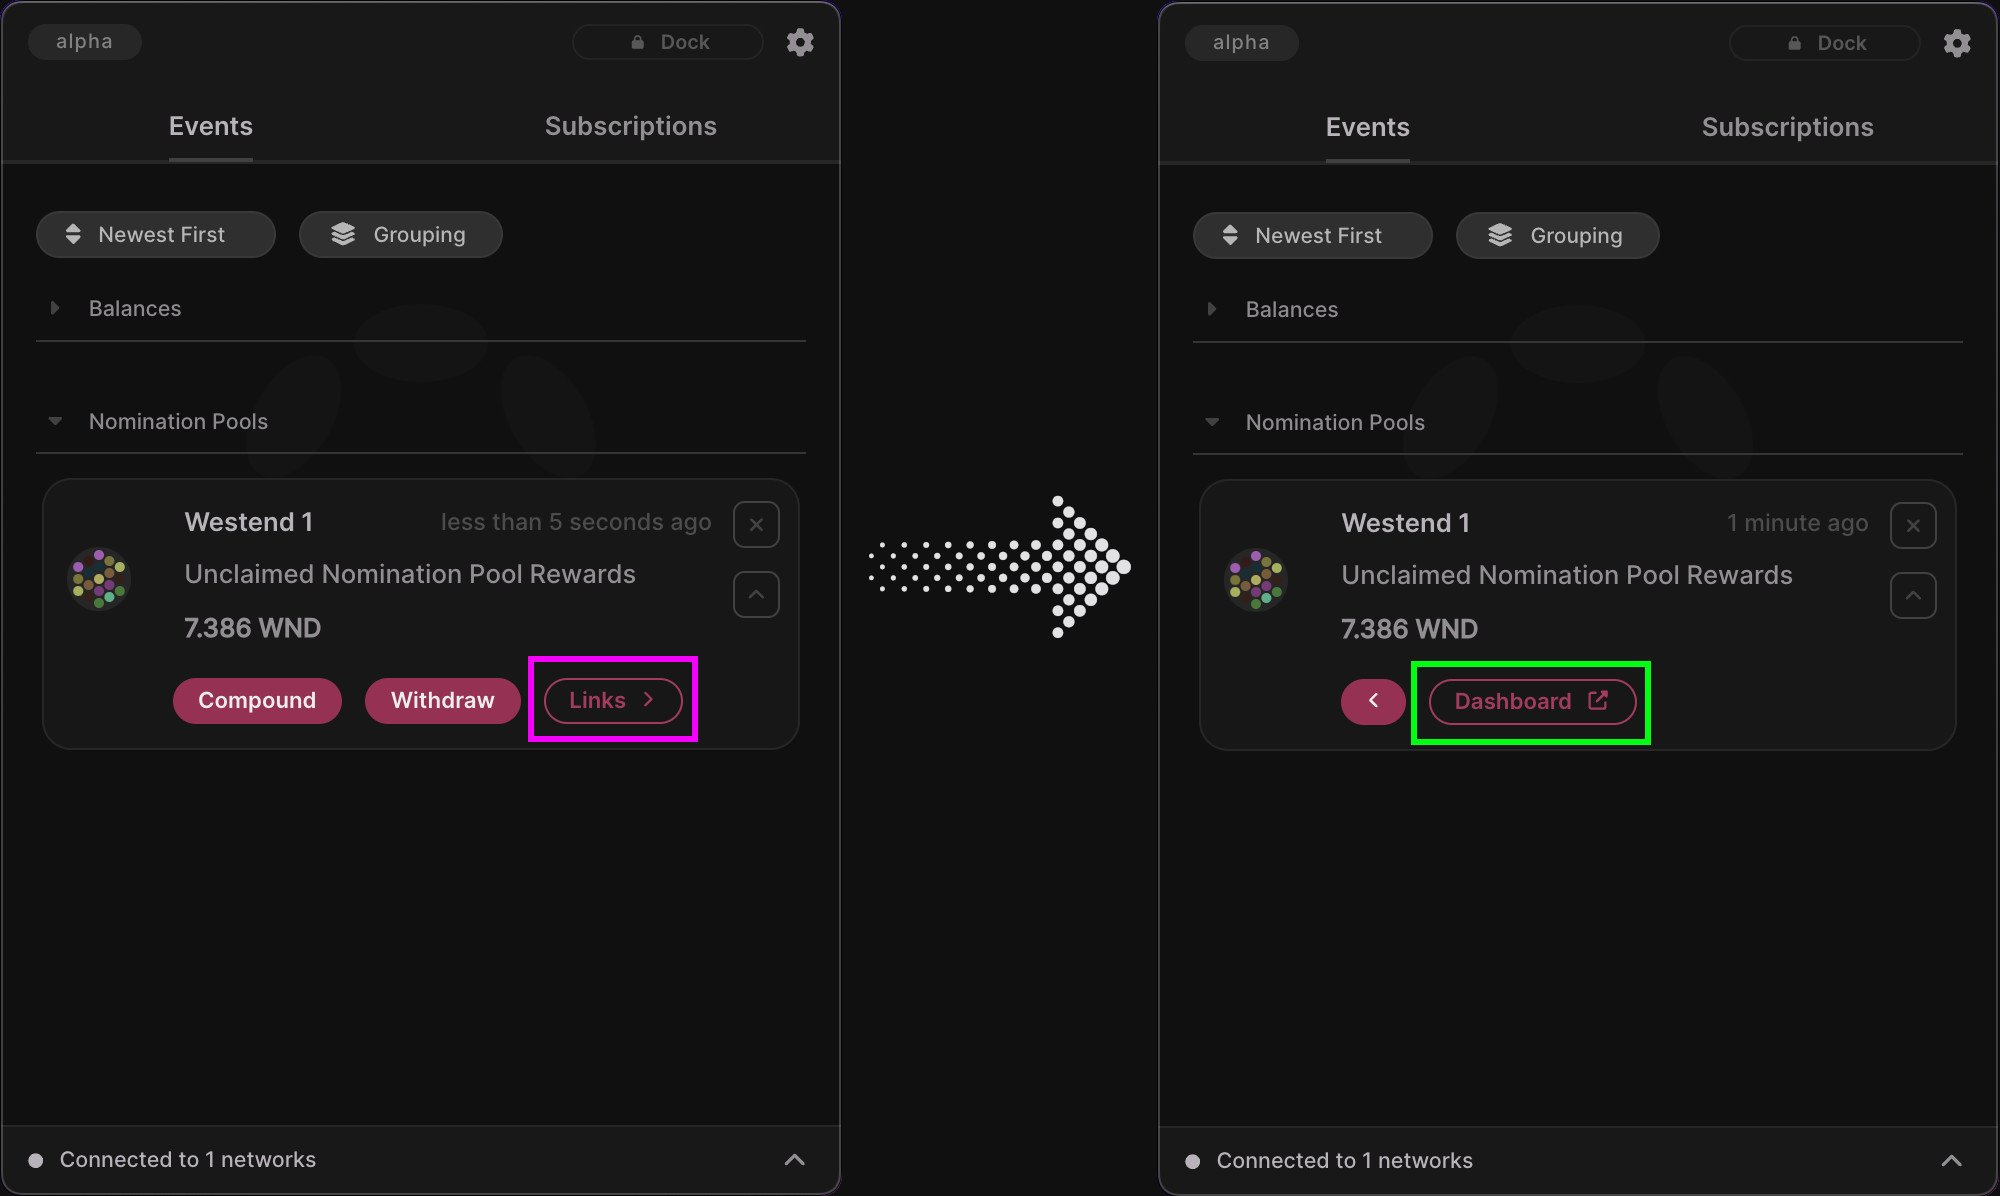
Notice how the Unclaimed Rewards event item includes some buttons that offer more functionality.
The Compound and Withdraw buttons allow you to submit an extrinsic from Polkadot Live to either compound your rewards back into the pool, or withdraw them to your account. This is all done in the Actions window, which offers a simple UI to review and submit extrinsics.
Submitting extrinsics is currently only possible with accounts imported via the Polkadot Vault application. We plan to support extrinsic signing with Ledger hardware wallets and using the WalletConnect protocol in the next development phase.
The Unclaimed Rewards event item also includes a link that will open the Polkadot Staking Dashboard in your default web browser. Feel free to click this link to inspect your staking steup in more detail.